woensdag 11 september 2013

Sneak preview - love birds


A dear friend of mine is getting married this week.. I promised to make her a handmade gift...
Its not complete because I'm not entirely happy with how it looks yet...   the tails of the love birds need to be adjusted and the threads need to be nicely tucked away..
I still have to think of a way to present it to her.. perhaps in a nest-like basket ? have not decided yet...
But anyway, here is a sneak preview....


The theme of her wedding is purple by the way..

Hopefully I'll be able to post a picture of the final result soon.

vrijdag 24 mei 2013

Diving in the deep...

I had just completed my second knitting project when I saw Charlotte's post on this lovely scarf. She had just learned to knit and by knitting this scarf she would learn all the knitting stitches in one go..

I was so inspired by this that I decided to make one myself.. because it really did make sense.. why wait years before knitting such a lovely scarf ? Why limit myself to the purl/knit stitches...
It felt like taking a deep dive.. but I was not alone in this... or so it felt...

There were only two things I forgot to mention (a) I only knew how to do knit/purl (b) I've never read a knitting chart before and have no idea how to read one.. but that was not going to put me off.. So I googled all the terms used in the pattern and watch many films on YouTube..  I also learnt that it is wise to use life-lines.. incase you make a mistake.. and I made plenty :-)

This is how far I got..... I've finished 20 reps...


The color I used is light pink (although it seems much darker with the colour filter i used... )
I have to say, it requires so much concentration.... counting and trying not to lose track of what row I'm knitting.. I find myself constantly confused as to where I am or should be..  so I count the stiches and then count some more... pfffff.. is there an easy way to do this ?

It is supposed to be a scarf that I would wear in the spring.. but if i keep up this pace I definitly won't be wearing it anytime this year... but who know ;)

will keep you posted on this WIP...

xoxo

dinsdag 21 mei 2013

Lady-bird, lady-bird fly away home


I found this lovely pattern on this blog, just the seeing it made me happy.. so sweet and simple, it looked like something from a fairy tale book..
It also reminded me of a nursery rhyme "lady-bird, lady-bird fly away home... "

After seeing the pattern, I couldn't seem to get it out of my head.. and when that happens, I find that the only way to to stop thinking about it was to actually do it.. so that it is out of my head and into the real world :)

I haven't done anything with embroidery before so I had to do some prep work, such as buying supplies and searching the internet on embriodery stiches and how to do them..
Then FINALY, I was ready to start working on it..... I decided to use the pattern on a pillow case as a present for my youngest sister

It only took me a couple of evenings to complete which was great! I love how it turned out, just like the original one :)

This is how the final result looked like:

This is a more up close photo (but with slightly different colour settings)


The thing I enjoyed the most about embroidery was how it made me feel... I really felt like a child colouring away in a colouring book.. only instead of crayons I was using thread and my colouring book was a piece of fabric :)

I think I'll start another embroidery project soon

xoxo

dinsdag 7 mei 2013

Baby Blanket


In 2011 an exciting event happened in the family.. My sister was pregnant of her first child.. I was to be an aunt for the very first time :)

As a gift I decided to make a baby blanket. When I started crocheting the blanket we didn't know if it was a going to be a baby boy or girl. So I choose the colours to fit both genders: pink and purple together with blue and white..
It was the largest project I had ever made.. Before crocheting this blanket, I never seemed to be patient enough to work on a big project.. I loved working on small projects that I could finish in a couple of days...  But exceptions can be made for exceptional events :-)

I started working on this blanket as soon as I heard my sister was pregnant.. so I had enough time to finish it before the baby was born..


Here is the final result: 


I loved how it looked in his bed and luckily so did my sister...
My nephew was born in novemeber... I remember how happy I was seeing him for the first time wrapped around in this blanket... keeping him warm and cozy...

Now I'm working on a second baby blanket.. this time for her second baby that is due in September!! So excited to be an auntie for the second time :-)

xoxo

vrijdag 3 mei 2013

My first knitted scarf

I have been crocheting for some years now but I’ve never been able to knit.. I have tried to teach myself to knit but for some reason I never felt comfortable using two knitting needles.. It always felt awkward as I was trying to hold them up properly and trying not to lose any stitches along the way..

But then I joined a group of lovely ladies who started a knitting club.. even people like me who only crocheted were welcome :) Seeing them knit all kinds of beautiful things made me want to knit as well.. so I asked one of the ladies there to teach me how to knit.. nothing fancy, only the knit/purl stitch to make a simple scarf for my little nephew..
I struggled a bit in the beginning but luckily she was there to help me out when I had no clue what I was doing...

It felt like it took me ages to complete because unlike crochet I really had to keep my eyes on the needles..   mistakes are not easily corrected compared to crocheting.. that is why for my very first knitting project I used yarn that would not really show any mistakes I may have made :-)

When I finished knitting the scarf, I crochet my nephew's name on it, to give it a personal touch.. I also added a few fringes at the ends of the scarf.

And here is the final result......


Not bad for a first time,  right ? ;-)

xoxo

Hello Kitty Scarf


A while back I saw this lovely Hello Kitty Scarf.. I was so excited to try it out that I decided to make one for my best friends daughter..

The instructions were very clear and I was surprised at how fast and easy it was to complete the whole scarf. Especially since you can join the granny squares together as you go... I love that the granny's were not actually squares but rectangles.. I don't know if you can see the difference in the photos  :)

The colours I used were bright pink, dark grey, light pink, white, black and yellow for the flower. I crochet in total 7 granny squares and 2 hello kitty ones. This is how it turned out...


My friend really liked the scarf and so did her daughter :) 

I really enjoyed making it.. who knows, perhaps I'll make another one soon...

xoxo

Pouf Make over


I have been following Joke's blog for a couple of years now (but i only just recently subscribed - shame on me).. last year I came across the following crochet pattern scheme on her blog:


I was so fond of this pattern.. (love at first sight ?).. I really wondered how it will look like in real life. So I wanted to try it out.. but crocheting a pattern just of the sake of it didn't make any sense at the time..  I wanted to use the pattern to make something out of it.. that can be used one way or the other..

Luckily my mum had a pouf somewhere in the house with a dull cover.. So I decided to give it a little make over :).. and of course try out the pattern above.. I was very excited to crochet a pouf cover because I have never made one before. Not only that, but I was going to use a scheme with no clear instructions. A true challenge! and I love me some challenge :) 

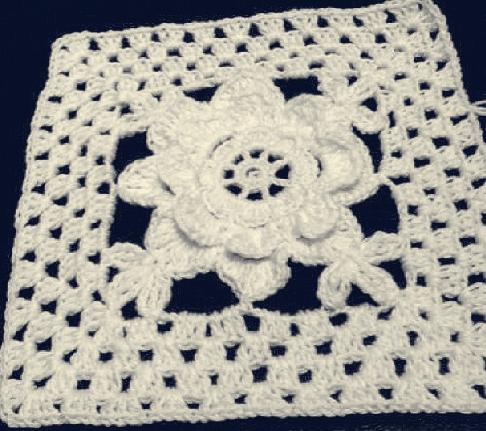
I chose white cotton, a beautiful colour mainly to give it a lacy effect. Also, the pouf was moved quite a lot in the house. I wanted it to fit in every room it went.. so with lots of focus and determination I started crocheting the pattern. I was so happy with how the flower part came out :)

Now I only had to crochet the edge around it .. and my first piece was done..


I made a couple of pieces and crochet them together.. This is how it looked like...


I was planning on making 4 pieces on each side.. a total of 20 pieces. But when i saw the four pieces together i started to wonder if that was such a good idea.. I didn't like how the centre part turned out (where the four pieces came together)..

So change of plan.. I decided to create one piece on every side with a wider border piece and this was the result...


I love how it turned out.. don't you ? My mum was also happy too when it was finally finished :)

xoxo